 |
| Photo credit |
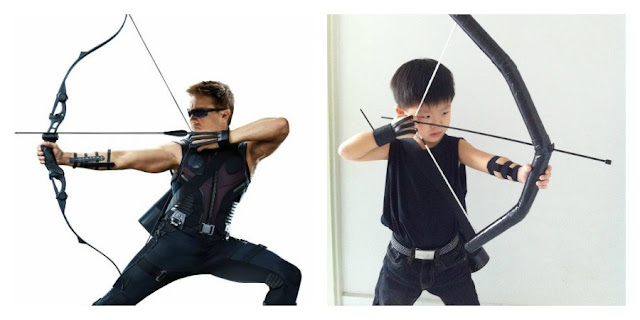
The following day, I went to two big neighbourhood malls but could not find a single black tank top for boys! Can you believe that? In the end, hubby found a black tee from Art Friend and we cut off the sleeves. Also got L a pair of black jeans and a belt to go with the Hawkeye look.
Making the bow:
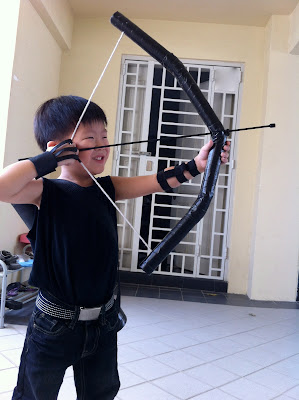
The DIY tutorial suggested using a PVC pipe to make a bow which really works and is safe to shoot. I used a long paper roll instead. Wouldn't want to risk having 20 children playing and shooting one another with the bow and arrows.
I made two slits across the points shown by the red arrows and bent the paper roll to form a curve. Then I taped the whole roll with black duct tape. You'll need to reinforce the two parts which bend with more duct tape.
Next, I poked a hole at each end of the paper roll and attached a string through the holes by tying a knot at each end.
To position the arrow easily, I poked a small hole through the centre of the paper roll and forced the plastic part of a syringe through, then cut off the excess part of the syringe. The plastic syringe was also sprayed black to create a uniformly black look.
I also added two tapes at the centre of the string (near the plastic syringe) to help L position his arrow more easily.
Making the quiver:
This was done using a cylinder tube from a courier service. I cut the tube to fit the diagonal length of L's body. Sprayed it with black paint and glued a strap to the top and bottom of the tube using hot glue gun and taped with black duct tape. The strap was from those free bags which I received from attending conferences and seminars. Really felt good reusing the things I collected years ago.
Making the arrows:
Hubby bought these two wooden sticks from Art Friend, but you can use anything that's long enough. My other alternative would be those wooden sticks we carry our paper lanterns with during the Mooncake Festival. I glued a small bead at one end of the stick and sprayed the whole thing black.
Making the finger glove:
Followed the instructions from Life Sprinkled With Glitter to make the finger glove. Hubby found black leather scraps and handicraft rings from Art Friend. I measured the length of a piece of leather around the wrist of L to make the rectangular-shaped wrist band. Remember to leave enough space for your Velcro strip. The Velcro strips were glued onto the leather wrist band using hot glue gun.
Next, I cut three thin strips of leather, each with the width of L's finger. One end of the strip was wrapped around the ring and hot-glued. Then the other end of all the three strips was hot-glued to the rectangular wrist band.
Note: I tried to stitch the leather straps together, as well as the Velcro strip, onto the wrist band... but it was so difficult. The leather was too thick for hand-stitching and my fingers got poked too much that I gave up. Maybe thin leather-like fabric will work much better.
Making the armguard:
Followed instructions from Life Sprinkled With Glitter to make the armguard. Hawkeye wore two armguards in The Avengers movie, but I think it's cool enough with just one armguard.
Using black elastic band, I measured L's arm (between the wrist and elbow) at three spots and hand-stitched each piece into a ring. Be sure to leave a little extra length for each circle as you will need to overlap the band when you stitch it together. Then the last elastic band goes along the arm to connect the three elastic rings and form the armguard.
L was so happy and excited on the day of the Halloween party. He said he didn't tell the teachers what he would be dressed as, 'cause he wanted it to be a surprise!
 |
| Hawkeye shooting at vampire teacher |
******
Migrating content from an entire blogging site to another blogging platform IS DEFINITELY not as easy as it seems. I'm in the midst of downloading and exporting all that I have from my Multiply site. Have sat on this action for a month, and have finally kicked myself hard enough to start doing something. At the very least, I've created a new blog here, and have started downloading all the media and blog entries from Multiply. Give me some credit please :)
Please bear with me as I go into hiatus for a while.
Birthday celebrations are always a simple affair in my family. Just a simple family meal with a slice of cake and a candle. But this year, we broke the tradition and had three themed birthday celebrations in a row! It all started with a watermelon-themed birthday party for Ch in July. L saw all the fun we had planning for Ch's party and requested for a birthday celebration too. And since we agreed to both their requests, it wouldn't be fair to K if we didn't celebrate her one-year old birthday right? That was how we had a Twinkle Twinkle Little Star themed party for K in August, followed by a Siew Mai themed party for L in September.
Here is the background behind K's birthday party theme.
+ party invite. These were printed on shimmery cardstock paper to bring out the theme of the celebration.
+ party decorations. I decided to hand-make the birthday bunting after having fun making one for the watermelon-themed party. The bunting read Kayleen is 1, and each letter was made of three layers - the top layer with a blue letter, the middle layer with scalloped borders which I painstakingly cut out because my lousy decorative scissors decided to fail on me, and the bottom white cardstock paper.
Menu for the catered dinner was printed on the same background as K's party invite and framed using a white wooden frame. I added my yellow smiley rubber star which I bought years ago.
+ party program. Games were intentionally left out for this party as we wanted everyone to mingle and chat. ZY did a slideshow of K which brought back so many fond memories of K's candid moments. We also had a cartoon movie screened to entertain the younger guests too.
Happy birthday dear K! You are definitely the star in our family, and I will always love you. Mommy prays that you will continue to be healthy, meeting your developmental milestones at your pace with our help and support. I know that God has been taking care of you and people around you will see His mercy, love and power. Kiss you! Muaak!!
+ party decorations. I decided to hand-make the birthday bunting after having fun making one for the watermelon-themed party. The bunting read Kayleen is 1, and each letter was made of three layers - the top layer with a blue letter, the middle layer with scalloped borders which I painstakingly cut out because my lousy decorative scissors decided to fail on me, and the bottom white cardstock paper.
Two helium balloons - blue and yellow - added shimmer to the party. The little stars strung on the cabinet were also hand-made.
Menu for the catered dinner was printed on the same background as K's party invite and framed using a white wooden frame. I added my yellow smiley rubber star which I bought years ago.
+ party favors. What's a birthday celebration without party favors? The honey stars and traditional chocolate biscuit sticks were a hit with the kids!
 |
| Some of our guests |
Happy birthday dear K! You are definitely the star in our family, and I will always love you. Mommy prays that you will continue to be healthy, meeting your developmental milestones at your pace with our help and support. I know that God has been taking care of you and people around you will see His mercy, love and power. Kiss you! Muaak!!


